The Background Recovery Service on Windows
Install, check, reconfigure or remove the RenderGod background recovery service on Windows, and set your BIOS so the PC turns itself back on after a power cut.
The background recovery service is a small Windows service, called RenderGod Helper, that resumes an interrupted render after a crash, restart or power cut. It starts with Windows before anyone signs in and stays idle until it is needed. This page walks through installing it, checking it, the BIOS power-on setting, and removing it.
Install the service
Open Settings > UnCrash Render Recovery and turn on PC crash, power loss or restart. The Background service row becomes available.
Click Set up. The Background Recovery Setup wizard opens. Click Get Started.
How It Works explains what the service does. Click Next.
On Ready to Install, click Install and accept the Windows administrator prompt. This is the only prompt; nothing else asks for permission later.
Setup Verification checks each part. When it reads "All components are configured and ready.", click Continue. If a part failed, click Retry Setup.
On You're All Set, click Next.
On One Last Check: Power Loss, answer "Does your PC usually turn itself back on after a sudden power cut?". Choose Yes, it comes back on, or No / not sure - show me how to open the BIOS guide. Click Finish.
A toast confirms "Background Recovery is active", and the Background service row shows Active. Setup also turns on Start at Login.
What the installer changes
- Creates a shared data folder for the queue and settings, so the service and the app use the same queue. See Where RenderGod stores its data.
- Registers the Helper as a startup service that runs as the Windows system account.
Check that the service is ready
Click Re-run setup on the Background service row. When the service is installed, the wizard opens on Background Recovery Active.
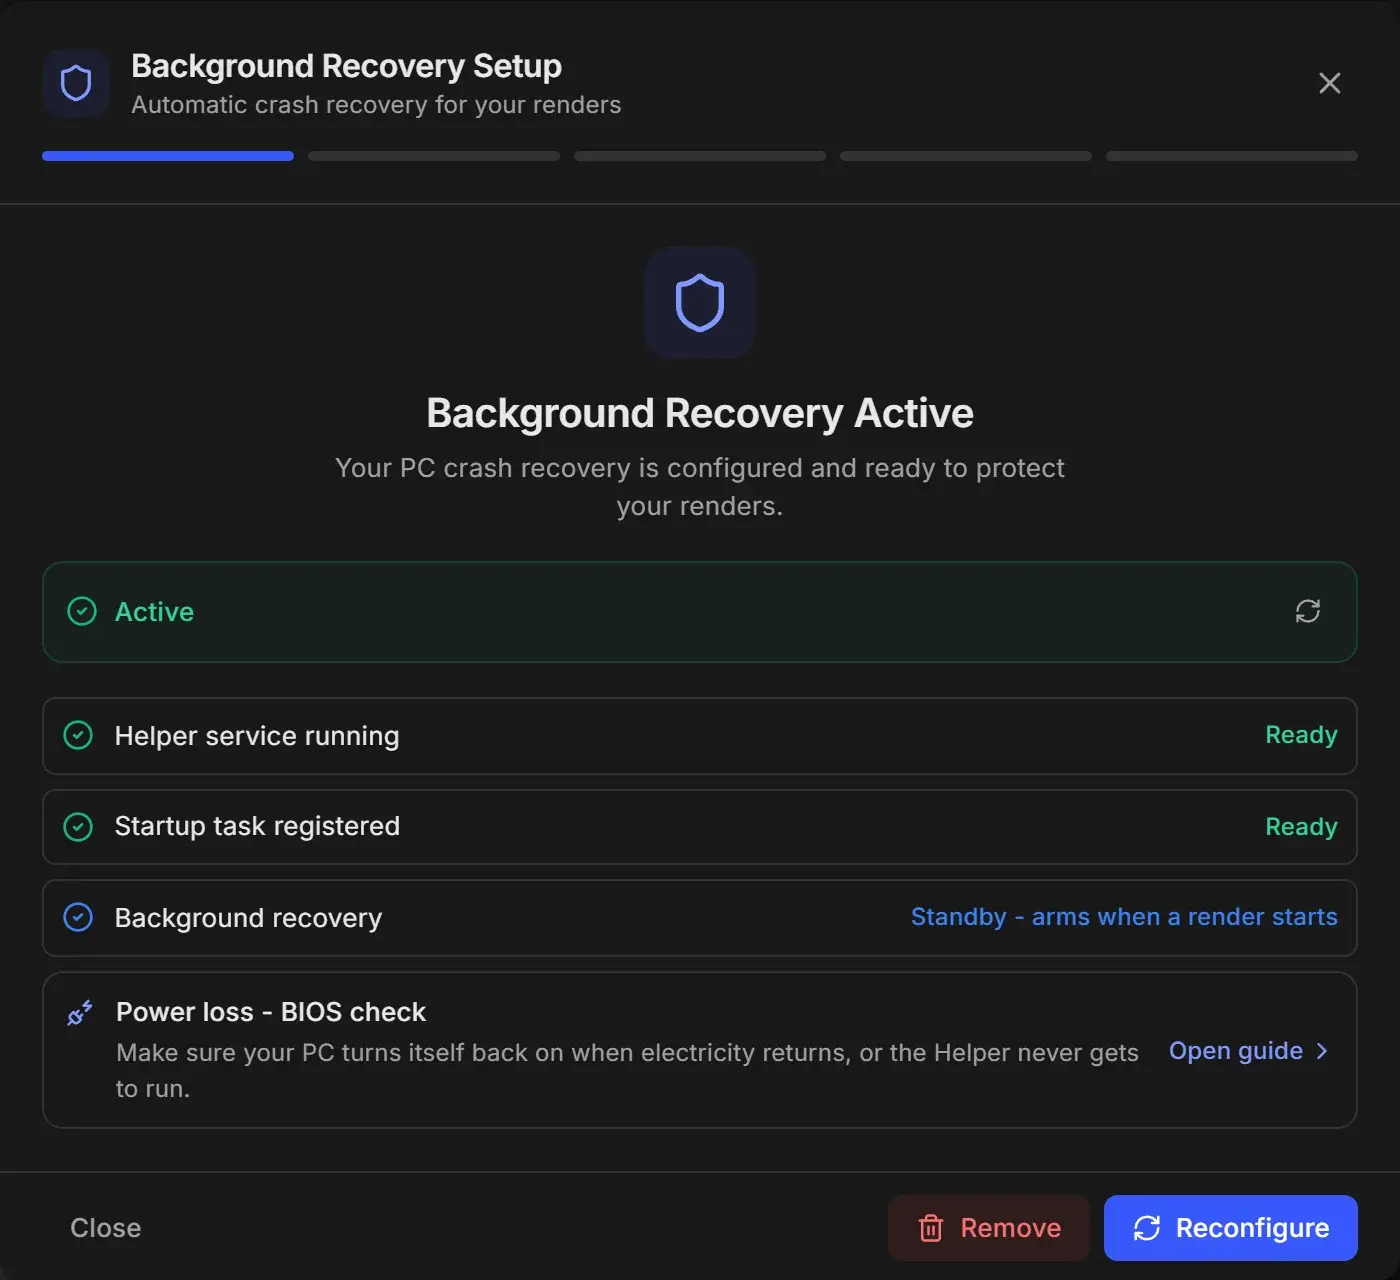
| Row | What it means |
|---|---|
| Helper service running | The service is installed and running. |
| Startup task registered | The service starts with Windows. |
| Background recovery | "Standby - arms when a render starts" when nothing is rendering. "Armed - resumes after a crash" while a render is in progress. |
| Power loss - BIOS check | A reminder to set your PC to power on after a power cut. Open guide opens the BIOS guide. |
Use the refresh icon next to Active to check again. Reconfigure runs the installer again, which helps if a row shows a problem.
Set the PC to turn on after a power cut
After a power cut most PCs stay off until someone presses the power button, so the Helper never gets to run. A one-time BIOS or UEFI setting fixes that. RenderGod cannot change it for you.
Open the guide from the last wizard step, or with Open guide on the Power loss - BIOS check row.
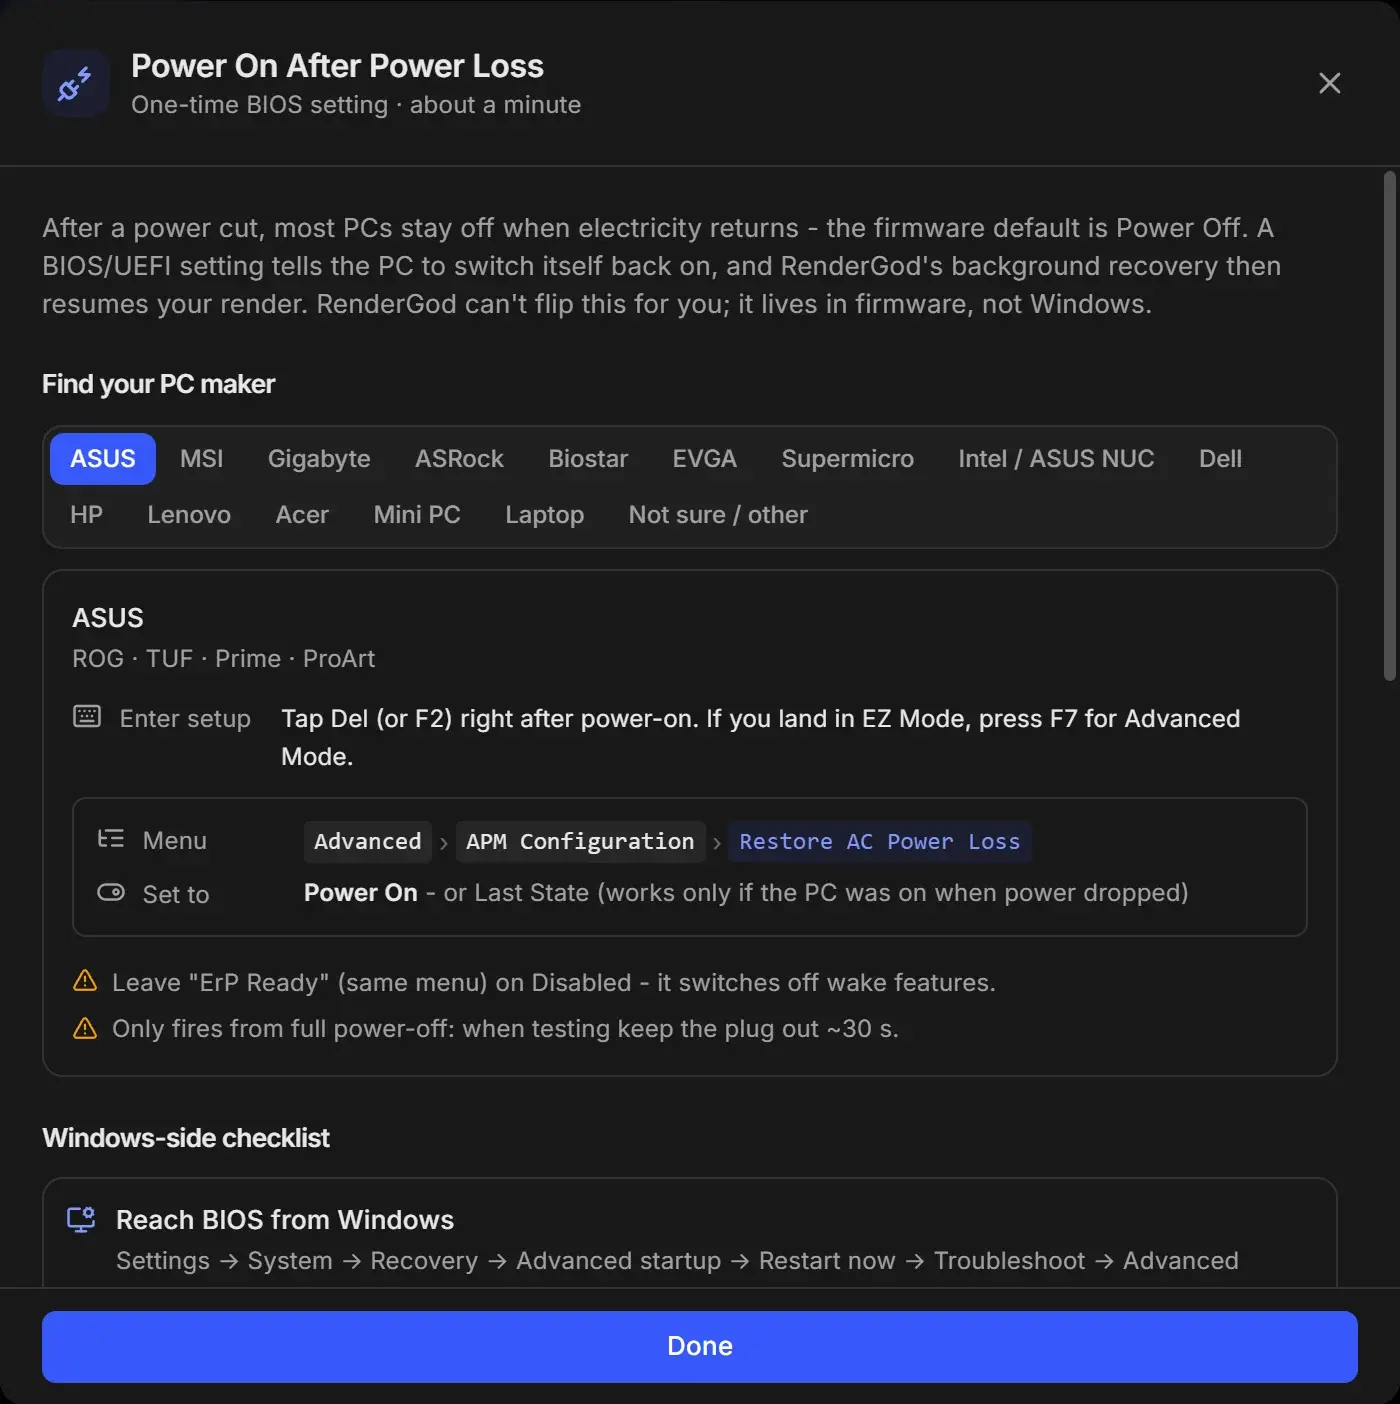
Under Find your PC maker, pick your motherboard or PC brand: ASUS, MSI, Gigabyte, ASRock, Biostar, EVGA, Supermicro, Intel / ASUS NUC, Dell, HP, Lenovo, Acer, Mini PC, Laptop, or Not sure / other.
Follow Enter setup to open the BIOS, go to the Menu path shown, and set the option to the Set to value. For ASUS, for example: Advanced > APM Configuration > Restore AC Power Loss set to Power On.
Read the warnings under the card. They list settings that block power-on, such as ErP or deep sleep options.
Save and let Windows start (usually F10).
"Last State" also exists on many boards, but it only powers on if the PC was on when the power dropped. Power On is the safer choice for a render machine.
Windows-side checklist
| Check | Why |
|---|---|
| Reach BIOS from Windows | Settings > System > Recovery > Advanced startup > Restart now > Troubleshoot > Advanced options > UEFI Firmware Settings, if you cannot catch the key at boot. |
| Automatically restart on crash: on | System Properties > Advanced > Startup and Recovery > Automatically restart (on by default) so Windows reboots after a blue screen. |
| Fast Startup: off | Power Options > Choose what the power buttons do, untick Turn on fast startup. |
| No boot-time password | A BitLocker PIN or a BIOS power-on password stops an unattended boot. BitLocker without a PIN is fine. |
| No sign-in needed | The Helper runs before anyone signs in. |
Test it (60 seconds)
- Set the option to Power On, save, and boot into Windows.
- Shut down from the Start menu, then pull the plug or switch off the power supply. Wait 10 to 30 seconds.
- Plug back in. The PC should turn on by itself within a few seconds. If it stays off, disable ErP, EuP or Deep Sleep in the BIOS and try again.
On a laptop
Most laptops do not have this option, and the battery keeps them running through short outages. Some business laptops offer "Wake on AC" or "Power On with AC Attach" instead; pick Laptop in the guide.
Remove the service
Click Re-run setup on the Background service row.
Click Remove. The list shows what will be removed: the Helper background service and startup task, and its shared configuration files.
Click Remove Setup, and accept the administrator prompt if Windows shows one. When "Setup Removed" appears, click Done.
Turning off PC crash, power loss or restart on its own does not remove the service.
Troubleshooting
Setup failed
If you see "Setup failed. Please try again." or a component marked as failed, click Retry Setup and make sure you accept the Windows administrator prompt. You need an account with administrator rights.
The render did not resume after a power cut
- Check that the PC actually turned on by itself. If not, set the BIOS option above.
- Check that the job is not on a network drive (No background resume badge).
- Check that a BIOS password or BitLocker PIN did not stop the boot.
- Open Re-run setup and confirm every row is Ready.