Using the Blender Addon to Send Projects
Learn how to use the RenderGod Blender Addon to send your Blender projects directly to the render queue. Once installed, sending projects is quick and easy.
Using the Blender Addon to Send Projects
Learn how to use the RenderGod Blender Addon to send your Blender projects directly to the render queue. Once installed, sending projects is quick and easy.
Prerequisites
Before using the addon:
- Addon must be installed - Complete the addon installation process first
- RenderGod must be running - The RenderGod application needs to be active
- Blender project must be saved - Save your project before sending to RenderGod
Important: Save Your Project First
Critical: Before sending your project to RenderGod, always save your Blender file. The addon sends the project in its last saved state, so any unsaved changes won't be included.
Saving Your Project
- In Blender, press Ctrl + S (or Cmd + S on Mac)
- Or go to File > Save
- Or go to File > Save As to save with a new name
Tip: Make it a habit to save before sending to RenderGod to ensure your latest changes are included.
Two Methods to Send Projects
The addon provides two convenient ways to send your Blender project to RenderGod:
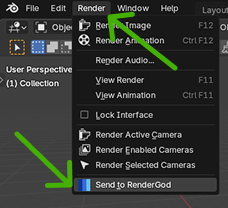
Method 1: Render Menu
This is the quickest method using Blender's standard menu system.
- Open your Blender project (and save it!)
- In Blender's top menu bar, click Render
- From the dropdown menu, select "Send To RenderGod"
- Your project will be immediately sent to RenderGod's queue
The project appears in RenderGod's render queue automatically, and you can continue working in Blender.
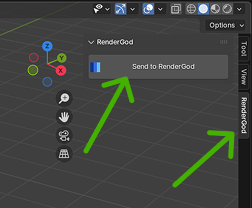
Method 2: N-Panel (Sidebar)
This method uses Blender's sidebar panel for quick access.
- Open your Blender project (and save it!)
- Press N in Blender to open the sidebar (N-panel)
- Look for the RenderGod tab in the sidebar
- Click the "Send to RenderGod" button
- Your project is sent to the queue immediately
Note: If you don't see the RenderGod tab, make sure the addon is installed and enabled in Blender's preferences.
What Happens After Sending?
After you click "Send to RenderGod", several things happen automatically:
- Project Analysis: RenderGod analyzes your Blender file
- Settings Detection: Render settings are automatically detected:
- Resolution
- Frame range
- Output format
- Scene and camera settings
- View layer configuration
- Queue Addition: A new job card appears in RenderGod's queue
- Ready to Render: The job is ready for rendering or further configuration
Verification
After sending, verify the project was added:
- Switch to RenderGod (or check if it's visible)
- Check the queue: Your project should appear as a new job card
- Review settings: Check that RenderGod detected your render settings correctly
- Modify if needed: Adjust any settings in RenderGod if necessary
Benefits of Using the Addon
Workflow Efficiency
- No file browsing: No need to navigate to your Blender files
- Instant queuing: Add projects in seconds
- Stay in Blender: Don't leave your creative workflow
Accuracy
- Current state: Always sends the most recently saved version
- No version confusion: Eliminates the risk of importing the wrong file
- Consistent results: Ensures the queue matches what you see in Blender
Convenience
- Multiple methods: Choose the method that fits your workflow
- Quick access: Available from standard Blender locations
- Seamless integration: Feels like a native Blender feature
Best Practices
Before Sending
- ✅ Save your project - Always save before sending
- ✅ Check render settings - Verify your render configuration is correct
- ✅ Save linked files - Ensure any linked assets are saved
- ✅ Close other applications (optional) - Free up system resources
After Sending
- ✅ Verify in queue - Check RenderGod to confirm the project was added
- ✅ Review detected settings - Make sure settings were detected correctly
- ✅ Adjust if needed - Modify settings in RenderGod if necessary
- ✅ Start rendering - Begin the render process when ready
Troubleshooting
Project Not Appearing in Queue
- Check RenderGod: Ensure RenderGod is running
- Check connection: The addon needs RenderGod to be active
- Verify file path: Ensure the Blender file path is accessible
- Try again: Sometimes a second attempt resolves temporary issues
Settings Not Detected
- Save project: Make sure you saved the project in Blender
- Use Reload: In RenderGod, click the "Reload" button on the job card
- Check Blender version: Ensure RenderGod's Blender version matches your project
Addon Not Working
- Verify installation: Check that the addon is installed and enabled
- Restart Blender: Some issues are resolved by restarting Blender
- Check RenderGod: Ensure RenderGod is running and accessible
Workflow Tips
Batch Sending
While you can't send multiple projects at once with a single click, you can:
- Send one project
- Quickly switch to another Blender project
- Save and send it
- Repeat for multiple projects
This creates an efficient batch workflow.
Organizing Projects
- Name your files clearly: Use descriptive names for easy identification in the queue
- Save before sending: Always save to ensure the latest version is queued
- Check queue order: Verify projects are added in the order you want them rendered
Related Features
- Blender Version Configuration: Ensure the correct Blender version is set
- Render Settings: Configure and customize render settings in RenderGod
- Queue Management: Manage multiple projects in your render queue
The addon makes sending projects to RenderGod quick and effortless. Start using it today to streamline your rendering workflow!
© 2026 RenderGod. All rights reserved.