RenderGod Installation Guide
Complete step-by-step instructions for installing RenderGod on your Windows computer. Follow these instructions carefully to ensure a successful installation.
RenderGod Installation Guide
Complete step-by-step instructions for installing RenderGod on your Windows computer. Follow these instructions carefully to ensure a successful installation.
Download RenderGod
The first step is to download the latest version of RenderGod from the official website.
- Navigate to https://rendergod.app/download in your web browser
- Click the download button to get the latest installer
- Save the installer file (RenderGod_Installer.exe) to a location you can easily find, such as your Downloads folder
Note: Always download RenderGod from the official website to ensure you're getting the legitimate, virus-free version.
Running the Installer
Once you've downloaded the installer, you're ready to begin the installation process.
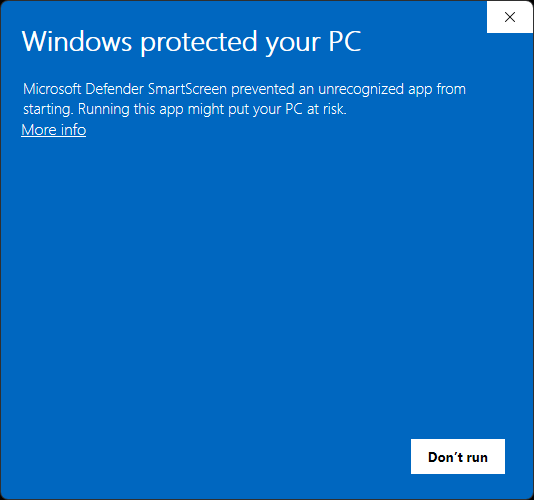
Handling Windows Security Warnings
Because RenderGod is a new application, Windows may display a security warning identifying it as coming from an "unverified publisher" or "unknown publisher."
Important: RenderGod is completely safe and free from any viruses or malware. You can verify this with any antivirus software of your choice.
If you see this warning message:
- Click the "More info" link to view additional details about the file
- This will reveal more options including the ability to run the installer anyway
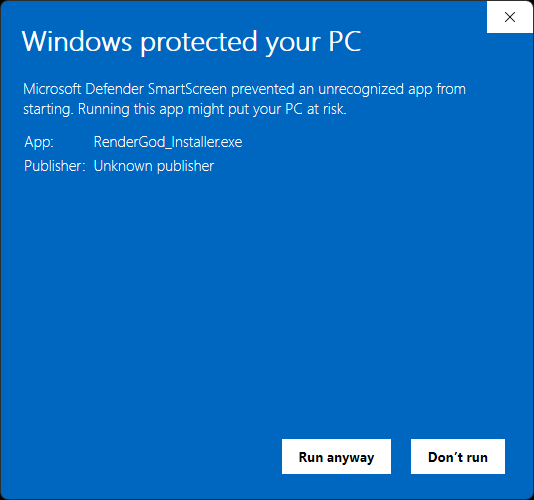
- After clicking "More info", click the "Run anyway" button to proceed with the installation
Security Note: This warning appears because RenderGod is a new application and hasn't yet been widely distributed. The application is digitally signed and safe to install. If you're concerned, you can scan the installer with your antivirus software before proceeding.
Installation Wizard
After clicking "Run anyway", the RenderGod installation wizard will open.

Step 1: Welcome Screen
- Review the welcome message
- Click the "Next" button to proceed to the installation directory selection
Step 2: Choose Installation Location

- The installer will suggest a default installation path (typically C:\Program Files\RenderGod)
- Recommended: Leave the default installation path as-is unless you have a specific reason to change it
- If you need to change the installation location:
- Click "Browse" to select a different folder
- Choose your desired installation directory
- Click "Next" to continue
Tip: The default installation path is optimized for Windows system compatibility. Only change it if you have specific requirements, such as installing on a different drive.
Step 3: Installation Process

- The installer will now begin copying files to your system
- Wait for the installation to complete - you'll see a progress bar indicating the installation status
- When the installation finishes, you'll see a "Completed!" message
- Click "Next" to proceed to the final step
The installation process typically takes only a few seconds. During this time, RenderGod's core files, libraries, and dependencies are installed to your system.
Step 4: Installation Complete

Congratulations! RenderGod has been successfully installed on your computer.
Final Installation Options
Before clicking "Finish", you'll see two important checkboxes:
- "Run RenderGod" - Recommended: Check this box to launch RenderGod immediately after installation
- "Create desktop shortcut" - Recommended: Check this box to create a desktop shortcut for easy access
We recommend keeping both options checked so that:
- RenderGod launches automatically after installation completes
- A desktop shortcut is created for convenient future access
Completing the Installation
- Ensure both checkboxes are checked (recommended)
- Click "Finish" to close the installation wizard
If you checked "Run RenderGod", the application will launch automatically. If you created a desktop shortcut, you'll find it on your desktop for future use.
Post-Installation Verification
After installation, verify that RenderGod is working correctly:
- Launch RenderGod either from the desktop shortcut or from the Start menu
- The application should open to the main interface
- You should see an empty render queue, ready for your first project
Next Steps
Now that RenderGod is installed, you can:
- Learn how to import Blender files to start rendering
- Set up your Blender version configuration
- Explore the various features and settings
- Install the Blender addon for direct integration
Continue reading the documentation to learn about importing files and configuring RenderGod for your workflow.
© 2026 RenderGod. All rights reserved.